目录
又是一学期过去了,博客也许久未更新,生活在鸡零狗碎中仓皇逃窜,留下一地的残篇断页,无人捡拾。而我,总算是鼓起勇气,拿起笔开始写一些总结了。
本文介绍的是深度学习中迁移学习 的入门级知识。项目是迪士尼公主 图像识别。
苦了我了!
数据预处理 说起来,我作为一个大老爷们,从来没有注意过迪士尼公主的事,直到有一天,在这门名叫“大数据统计建模与深度学习”的课上,我与四位女同学组队,找感兴趣的话题时,才第一次知道迪士尼有这么多公主(我本身的推荐是识别军用船和民用船,被直接pass=.=),而队友们跃跃欲试,我大呼上当快跑,可为时已晚。
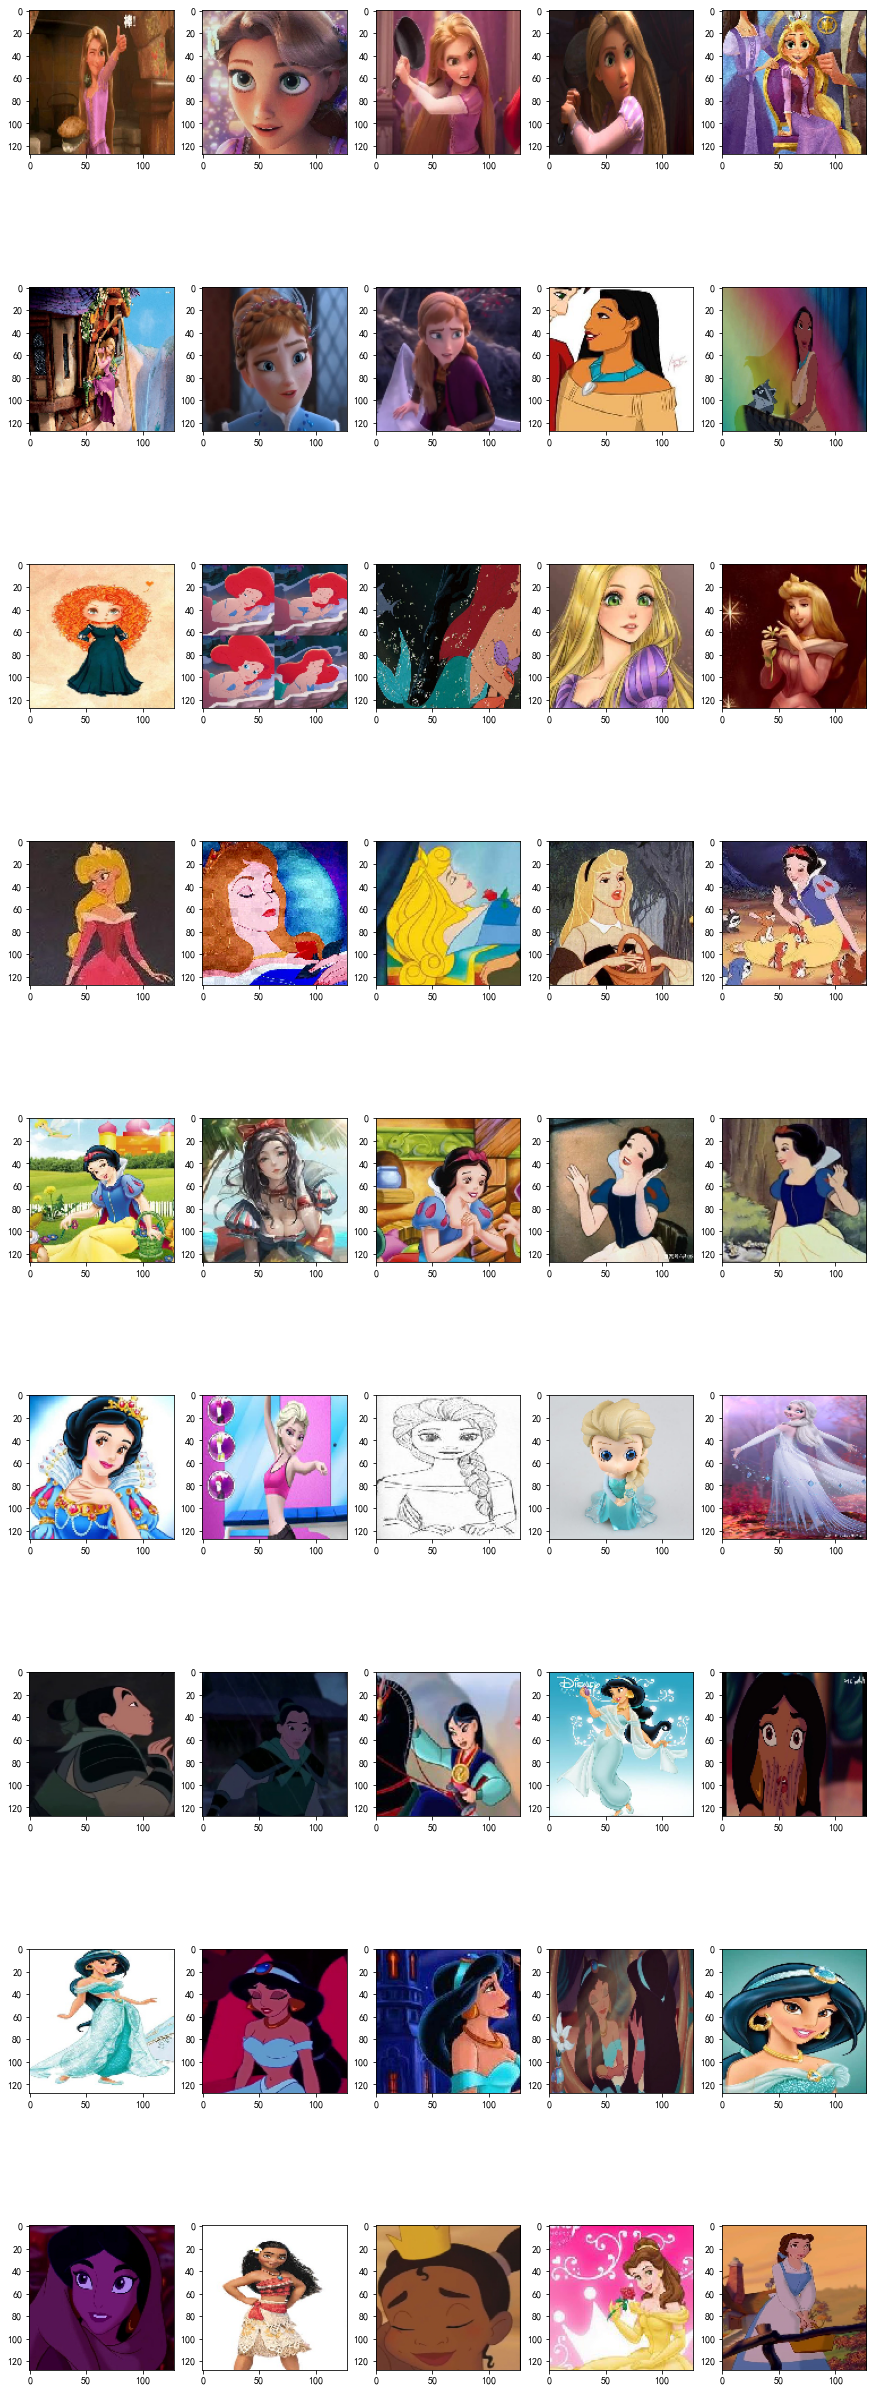
本文用到的数据,竟然是我们几个现场爬下来的(因此,预期也不是很高),百度、bilibili的视频截图,一共十四类,2333张。
公主们的名字:
这里随口一提,tf2.0与keras组合绝对是萌新的不二之选。
1
2
3
4
5
6
7
8
9
10
11
12
13
14
15
16
17
18
19
20
21
22
23
24
25
26
27
28
29
30
31
32
33
import tensorflow as tffrom keras.layers import Activation, Conv2D, BatchNormalization, Dense, add from keras.layers import Dropout, Flatten, Input, MaxPooling2D, ZeroPadding2D, AveragePooling2D,GlobalAveragePooling2Dfrom keras import Modelfrom keras.preprocessing.image import ImageDataGeneratorfrom keras.optimizers import Adamfrom keras import backend as Kimport osimport pickleimport pandas as pdimport numpy as npfrom matplotlib import pyplot as pltplt.rcParams['font.sans-serif' ] = ['SimHei' ] import pinyin.cedictgpus = tf.config.experimental.list_physical_devices('GPU' ) if gpus: try : for gpu in gpus: tf.config.experimental.set_memory_growth(gpu, True ) logical_gpus = tf.config.experimental.list_logical_devices('GPU' ) print(len(gpus), "Physical GPUs," , len(logical_gpus), "Logical GPUs" ) except RuntimeError as e: print(e)
调包的过程其实可以一段一段来,我们进行了整理。如果需要使用GPU,可以用这段代码查看是否有可用的GPU。(当然,需要TensorFlow-gpu版本。)
1 2 3 4 5 6 7 8 9 10 princess_list = ['艾莎' ,'爱丽儿' ,'爱洛' ,'安娜' ,'白雪' ,'宝嘉康蒂' ,'贝儿' ,'蒂安娜' , '花木兰' ,'灰姑娘' ,'乐佩' ,'梅丽达公主' ,'茉莉公主' ,'莫安娜' ] data_dir = './data' output_path = './output' if os.path.exists(output_path) == False : os.mkdir(output_path)
上面的代码是对图片数据的位置进行了整理。都是准备工作。下面正片就要开始了。
1 2 3 4 5 6 7 8 9 10 11 12 13 14 15 16 17 18 19 20 21 22 23 24 25 26 27 28 29 30 31 32 33 34 35 36 37 38 39 40 41 42 43 44 45 46 47 48 49 50 51 def load_data (im_size, batch_size=64 ) : datagen = ImageDataGenerator( rescale=1. /255 , shear_range=0.5 , rotation_range=30 , zoom_range=0.2 , width_shift_range=0.2 , height_shift_range=0.2 , horizontal_flip=True , validation_split = 0.2 ) train_generator = datagen.flow_from_directory( data_dir, target_size=(im_size, im_size), batch_size=batch_size, classes=princess_list, class_mode='categorical' , seed=1024 , subset='training' ) validation_generator = datagen.flow_from_directory( data_dir, target_size=(im_size, im_size), batch_size=batch_size, classes=princess_list, class_mode='categorical' , shuffle=False , seed=1024 , subset='validation' ) return (train_generator,validation_generator) (train_generator,validation_generator) = load_data(im_size=224 , batch_size=64 ) X_train,y_train = next(train_generator) X_test ,y_test = next(validation_generator) print(X_train.shape) print(y_train.shape) train_generator.class_indices
数据增强是一种常见的扩大训练集的方式,通过旋转、镜像、变化、裁切等方式进行数据扩充。
最终输出如下:
Found 1873 images belonging to 14 classes.
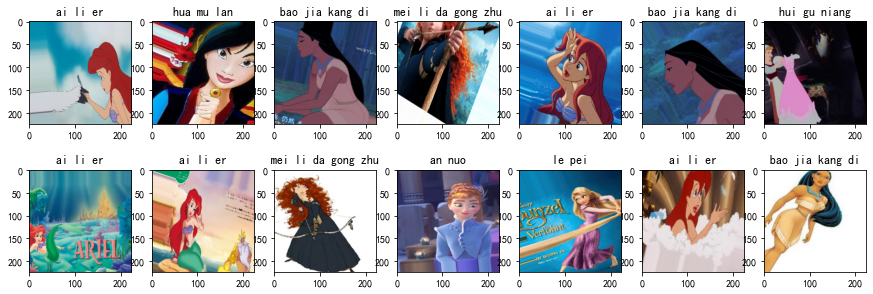
1 2 3 4 5 6 7 8 9 10 11 12 13 plt.figure() fig,ax = plt.subplots(2 ,7 ) fig.set_figheight(5 ) fig.set_figwidth(15 ) ax = ax.flatten() for i in range(14 ): ax[i].imshow(X_train[i,:,:,:]) prin_name = princess_list[np.where(y_train[i]==1 )[0 ][0 ]] ax[i].set_title(pinyin.get(prin_name, format="strip" , delimiter=" " ))
公主们的样貌也展示如下。
模型应用 本节均使用通过imagenet预训练好的VGG16、ResNet、InceptionV3、MobileNet卷积层参数,并在此基础上训练14分类的全连接层。
VGG16 1 2 3 4 5 6 7 8 9 10 11 12 13 14 15 16 17 18 19 20 21 22 23 24 from keras import backend as KK.clear_session() from keras.applications.vgg16 import VGG16(train_vgg16,validation_vgg16) = load_data(im_size = 224 , batch_size = 64 ) vgg_base = VGG16(weights='imagenet' , include_top=False ) vgg_x = vgg_base.output vgg_x = GlobalAveragePooling2D()(vgg_x) vgg_x = Dense(128 ,activation='relu' )(vgg_x) vgg_pred = Dense(14 ,activation='softmax' )(vgg_x) vgg_model = Model(inputs=vgg_base.input, outputs=vgg_pred) for layer in vgg_base.layers: layer.trainable = False vgg_model.summary()
输出如下(即VGG16网络的结构):
1 2 3 4 5 6 7 8 9 10 11 12 13 14 15 16 17 18 19 20 21 22 23 24 25 26 27 28 29 30 31 32 33 34 35 36 37 38 39 40 41 42 43 44 45 46 47 48 49 50 51 52 Model: "model_1" _____ _____ _____ _____ _____ _____ _____ _____ _____ _____ _____ _____ _____ Layer (type) Output Shape Param # ================================================================= input_1 (InputLayer) (None, None, None, 3) 0 _____ _____ _____ _____ _____ _____ _____ _____ _____ _____ _____ _____ _____ block1_conv1 (Conv2D) (None, None, None, 64) 1792 _____ _____ _____ _____ _____ _____ _____ _____ _____ _____ _____ _____ _____ block1_conv2 (Conv2D) (None, None, None, 64) 36928 _____ _____ _____ _____ _____ _____ _____ _____ _____ _____ _____ _____ _____ block1_pool (MaxPooling2D) (None, None, None, 64) 0 _____ _____ _____ _____ _____ _____ _____ _____ _____ _____ _____ _____ _____ block2_conv1 (Conv2D) (None, None, None, 128) 73856 _____ _____ _____ _____ _____ _____ _____ _____ _____ _____ _____ _____ _____ block2_conv2 (Conv2D) (None, None, None, 128) 147584 _____ _____ _____ _____ _____ _____ _____ _____ _____ _____ _____ _____ _____ block2_pool (MaxPooling2D) (None, None, None, 128) 0 _____ _____ _____ _____ _____ _____ _____ _____ _____ _____ _____ _____ _____ block3_conv1 (Conv2D) (None, None, None, 256) 295168 _____ _____ _____ _____ _____ _____ _____ _____ _____ _____ _____ _____ _____ block3_conv2 (Conv2D) (None, None, None, 256) 590080 _____ _____ _____ _____ _____ _____ _____ _____ _____ _____ _____ _____ _____ block3_conv3 (Conv2D) (None, None, None, 256) 590080 _____ _____ _____ _____ _____ _____ _____ _____ _____ _____ _____ _____ _____ block3_pool (MaxPooling2D) (None, None, None, 256) 0 _____ _____ _____ _____ _____ _____ _____ _____ _____ _____ _____ _____ _____ block4_conv1 (Conv2D) (None, None, None, 512) 1180160 _____ _____ _____ _____ _____ _____ _____ _____ _____ _____ _____ _____ _____ block4_conv2 (Conv2D) (None, None, None, 512) 2359808 _____ _____ _____ _____ _____ _____ _____ _____ _____ _____ _____ _____ _____ block4_conv3 (Conv2D) (None, None, None, 512) 2359808 _____ _____ _____ _____ _____ _____ _____ _____ _____ _____ _____ _____ _____ block4_pool (MaxPooling2D) (None, None, None, 512) 0 _____ _____ _____ _____ _____ _____ _____ _____ _____ _____ _____ _____ _____ block5_conv1 (Conv2D) (None, None, None, 512) 2359808 _____ _____ _____ _____ _____ _____ _____ _____ _____ _____ _____ _____ _____ block5_conv2 (Conv2D) (None, None, None, 512) 2359808 _____ _____ _____ _____ _____ _____ _____ _____ _____ _____ _____ _____ _____ block5_conv3 (Conv2D) (None, None, None, 512) 2359808 _____ _____ _____ _____ _____ _____ _____ _____ _____ _____ _____ _____ _____ block5_pool (MaxPooling2D) (None, None, None, 512) 0 _____ _____ _____ _____ _____ _____ _____ _____ _____ _____ _____ _____ _____ global_average_ pooling2d_1 ( (None, 512) 0 _____ _____ _____ _____ _____ _____ _____ _____ _____ _____ _____ _____ _____ dense_1 (Dense) (None, 128) 65664 _____ _____ _____ _____ _____ _____ _____ _____ _____ _____ _____ _____ _____ dense_2 (Dense) (None, 14) 1806 ================================================================= Total params: 14,782,158 Trainable params: 67,470 Non-trainable params: 14,714,688 _____ _____ _____ _____ _____ _____ _____ _____ _____ _____ _____ _____ _____
训练的过程就是让原有的权重对现有数据进行过拟合的过程。
1 2 3 4 5 6 7 8 9 10 11 12 13 14 15 16 17 18 19 20 21 22 23 vgg_model.compile(loss='categorical_crossentropy' , optimizer=Adam(lr=0.001 ), metrics=['accuracy' ] ) vgg_history = vgg_model.fit_generator(train_vgg16 ,validation_data=validation_vgg16 ,epochs=1 ) if os.path.exists(output_path + '/model' ) == False : os.mkdir(output_path + '/model' )if os.path.exists(output_path + '/acc' ) == False : os.mkdir(output_path + '/acc' )with open(output_path + '/acc/vgg16_history.txt' , 'wb' ) as f: pickle.dump(vgg_history.history, f) vgg_model.save(output_path + "/model/vgg16.h5" )
ResNet 1 2 3 4 5 6 7 8 9 10 11 12 13 14 15 16 17 18 19 20 21 22 23 24 25 26 K.clear_session() from keras.applications.resnet import ResNet50(train_resnet50,validation_resnet50) = load_data(im_size=224 , batch_size = 64 ) resnet_base = ResNet50(weights='imagenet' ,include_top=False ) resnet_x = resnet_base.output resnet_x = GlobalAveragePooling2D()(resnet_x) resnet_x = Dense(128 ,activation='relu' )(resnet_x) resnet_pred = Dense(14 ,activation='softmax' )(resnet_x) resnet_model = Model(inputs = resnet_base.input ,outputs = resnet_pred) for layer in resnet_base.layers: layer.trainable = False resnet_model.summary()
我本来想对模型进行最完整的展示,但其实适合放一张图上来。中间的网络细节就不展示了。
1 2 3 4 5 6 7 Model: "model_1" ================================================================================================== Total params: 23,851,790 Trainable params: 264,078 Non-trainable params: 23,587,712 _____ _____ _____ _____ _____ _____ _____ _____ _____ _____ _____ _____ _____ _____ _____ _____ _____ _____ _____ ___
1 2 3 4 5 6 7 8 9 10 11 12 13 14 15 16 17 18 19 20 21 22 resnet_model.compile(loss='categorical_crossentropy' , optimizer=Adam(lr=0.001 ), metrics=['accuracy' ] ) resnet_history = resnet_model.fit_generator(train_resnet50 ,validation_data=validation_resnet50 ,epochs=1 ) if os.path.exists(output_path + '/model' ) == False : os.mkdir(output_path + '/model' )if os.path.exists(output_path + '/acc' ) == False : os.mkdir(output_path + '/acc' )with open(output_path + '/acc/resnet_history.txt' , 'wb' ) as f: pickle.dump(vgg_history.history, f) resnet_model.save(output_path + "/model/resnet.h5" )
其他模型(InceptionV3) 甚至,后面的代码我想一并贴出来。
1 2 3 4 5 6 7 8 9 10 11 12 13 14 15 16 17 18 19 20 21 22 23 24 25 26 27 28 29 30 31 32 33 34 35 36 37 38 39 40 41 42 43 44 45 46 47 48 49 50 K.clear_session() from keras.applications.inception_v3 import InceptionV3(train_InceptionV3, validation_InceptionV3) = load_data(im_size=224 , batch_size= 64 ) inceV3_base = InceptionV3(weights='imagenet' ,include_top=False ) inceV3_x = inceV3_base.output inceV3_x = GlobalAveragePooling2D()(inceV3_x) inceV3_x = Dense(128 ,activation='relu' )(inceV3_x) inceV3_pred = Dense(14 ,activation='softmax' )(inceV3_x) InceptionV3_model = Model(inputs = inceV3_base.input ,outputs = inceV3_pred) for layer in inceV3_base.layers: layer.trainable = False InceptionV3_model.summary() InceptionV3_model.compile(loss='categorical_crossentropy' , optimizer=Adam(lr=0.001 ), metrics=['accuracy' ] ) InceptionV3_history = InceptionV3_model.fit_generator(train_InceptionV3 ,validation_data=validation_InceptionV3 ,epochs=100 ) if os.path.exists(output_path + '/model' ) == False : os.mkdir(output_path + '/model' )if os.path.exists(output_path + '/acc' ) == False : os.mkdir(output_path + '/acc' )with open(output_path + '/acc/InceptionV3_history.txt' , 'wb' ) as f: pickle.dump(InceptionV3_history.history, f) InceptionV3_model.save(output_path + "/model/InceptionV3.h5" )
MobileNet
1 2 3 4 5 6 7 8 9 10 11 12 13 14 15 16 17 18 19 20 21 22 23 24 25 26 27 28 29 30 31 32 33 34 35 36 37 38 39 40 41 42 43 44 K.clear_session() from keras.applications import MobileNet(train_MobileNet, validation_MobileNet) = load_data(im_size=224 , batch_size=64 ) mobile_base = MobileNet(weights='imagenet' ,include_top=False ) mobile_x = mobile_base.output mobile_x = GlobalAveragePooling2D()(mobile_x) mobile_x = Dense(128 , activation='relu' )(mobile_x) MobileNet_pred = Dense(14 , activation='softmax' )(mobile_x) MobileNet_model = Model(inputs = mobile_base.input ,outputs = MobileNet_pred) for layer in mobile_base.layers: layer.trainable = False MobileNet_model.summary() MobileNet_model.compile(loss='categorical_crossentropy' , optimizer=Adam(lr=0.001 ), metrics=['accuracy' ]) MobileNet_history = MobileNet_model.fit_generator(train_MobileNet ,validation_data=validation_MobileNet ,epochs=100 ) if os.path.exists(output_path + '/model' ) == False : os.mkdir(output_path + '/model' )if os.path.exists(output_path + '/acc' ) == False : os.mkdir(output_path + '/acc' )with open(output_path + '/acc/MobileNet_history.txt' , 'wb' ) as f: pickle.dump(MobileNet_history.history, f) MobileNet_model.save(output_path + "/model/MobileNet.h5" )
训练的过程千篇一律,因为我们站在巨人的肩膀上,相当于只是对最后一层全连接进行了一定程度的“过拟合”。
而出乎所有人预料的是,效果竟然还可以。
模型结果评价 模型学习曲线 1 2 3 4 5 6 7 8 9 10 11 12 def plot_learning_curves (history) : pd.DataFrame(history.history).plot(figsize = (8 ,5 )) plt.grid(True ) plt.gca().set_ylim(0.2 ,1.2 ) plt.show() plot_learning_curves(vgg_history) plot_learning_curves(resnet_history) plot_learning_curves(InceptionV3_history) plot_learning_curves(MobileNet_history)
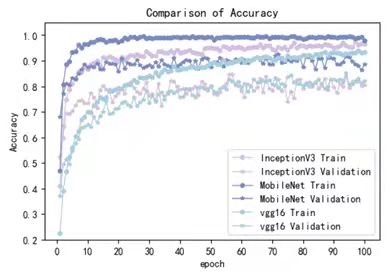
上面的图是我训练时候的(草稿里的),粘过来也看看。
总的来说,还是mobilenet最好,既满足了轻量化需求,又显示出超高的准确率,验证集上效果也不错。只是图有点糊了……没找到原图。
模型准确率 1 2 3 4 5 6 7 8 9 10 11 12 13 14 15 16 17 18 19 20 21 22 23 24 25 26 27 28 29 30 31 32 33 34 35 36 37 38 model_name = [] train_acc = [] val_acc = [] path_model_result = output_path + "/acc" for file_name in os.listdir(path_model_result): model_name.append(file_name.split('_' )[0 ]) with open(os.path.join(path_model_result, file_name), 'rb' ) as f: model_history = pickle.load(f) train_acc.append(model_history["accuracy" ]) val_acc.append(model_history["val_accuracy" ]) plt.figure(dpi=100 ) epoch_list = range(1 , 101 ) color_set=['red' ,'blue' ,'green' ,'yellow' ] for model_loc in range(len(model_name)): plt.plot(epoch_list, train_acc[model_loc], marker='o' , label=model_name[model_loc]+'Train' ) plt.plot(epoch_list, val_acc[model_loc], marker='*' , label=model_name[model_loc]+'Validation' ) plt.ylim(0.2 , 1.0 ) plt.legend() plt.xticks(epoch_list) plt.xlabel(u"epoch" ) plt.ylabel("Accuracy" ) plt.title("Comparison of Accuracy" ) plt.show()
什么,我的代码这里竟然出现了些问题,存档时候丢了什么,没能跑出来qwq。请读者自行脑补(bushi
不放图的理由增加了,拒绝所有“云丹师”。
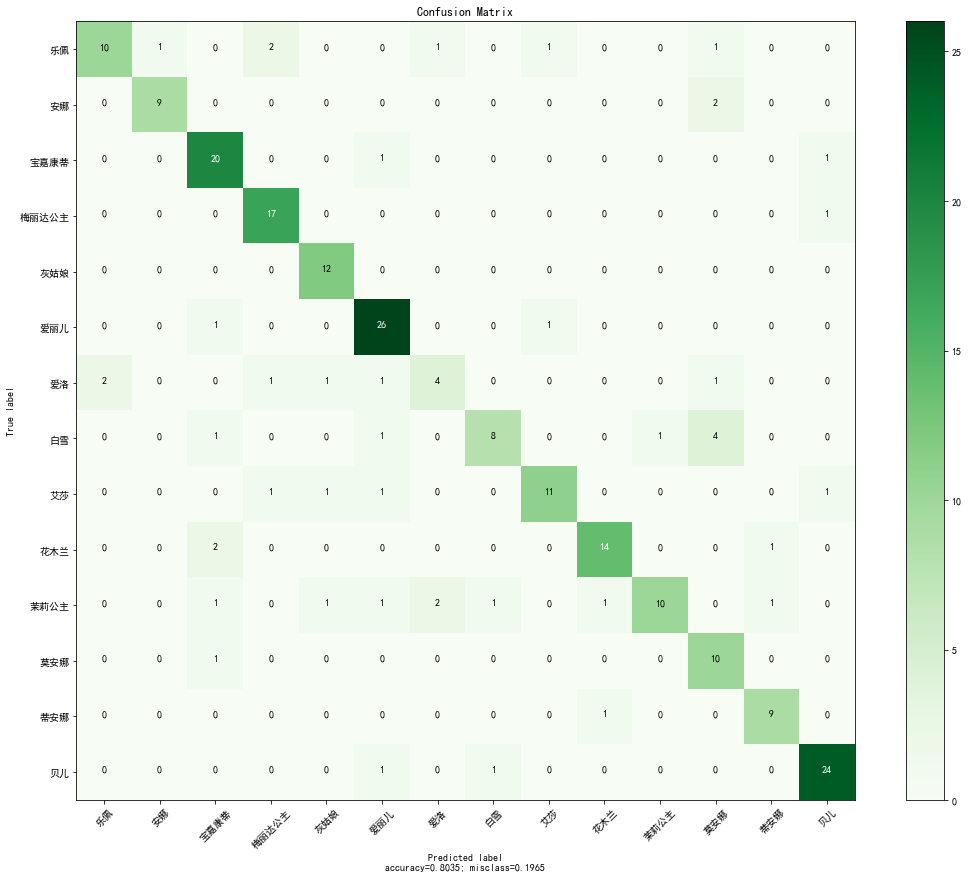
比较有学习意义的是下面这个,名叫“错分分析”的部分。目的是看一看这些模型的混淆矩阵。
1 2 3 4 5 6 7 8 9 10 11 12 13 14 15 16 17 18 19 20 21 22 23 24 25 26 27 28 29 30 31 32 33 34 35 36 37 38 39 40 41 42 43 44 45 46 47 48 49 50 51 52 53 54 55 from sklearn.metrics import confusion_matrixdef plot_confusion_matrix (cm, target_names, title='Confusion matrix' , cmap=plt.cm.Greens,#这个地方设置混淆矩阵的颜色主题 normalize=True) : from itertools import product plt.rcParams['font.sans-serif' ] = ['SimHei' ] accuracy = np.trace(cm) / float(np.sum(cm)) misclass = 1 - accuracy if cmap is None : cmap = plt.get_cmap('Blues' ) plt.figure(figsize=(15 , 12 )) plt.imshow(cm, interpolation='nearest' , cmap=cmap) plt.title(title) plt.colorbar() if target_names is not None : tick_marks = np.arange(len(target_names)) plt.xticks(tick_marks, target_names, rotation=45 ) plt.yticks(tick_marks, target_names) if normalize: cm = cm.astype('float' ) / cm.sum(axis=1 )[:, np.newaxis] thresh = cm.max() / 1.5 if normalize else cm.max() / 2 for i, j in product(range(cm.shape[0 ]), range(cm.shape[1 ])): if normalize: plt.text(j, i, "{:0.4f}" .format(cm[i, j]), horizontalalignment="center" , color="white" if cm[i, j] > thresh else "black" ) else : plt.text(j, i, "{:,}" .format(cm[i, j]), horizontalalignment="center" , color="white" if cm[i, j] > thresh else "black" ) plt.tight_layout() plt.ylabel('True label' ) plt.xlabel('Predicted label\naccuracy={:0.4f}; misclass={:0.4f}' .format(accuracy, misclass)) plt.savefig('./confusionmatrix_14.png' ,dpi=1000 ) plt.show() def plot_confuse (predictions,true_label,target_names) : truelabel = true_label conf_mat = confusion_matrix(y_true=truelabel, y_pred=predictions) plt.figure() plot_confusion_matrix(conf_mat, normalize=False ,target_names = target_names,title='Confusion Matrix' )
1 2 3 4 5 6 7 8 9 10 11 12 13 14 15 16 17 18 19 20 21 22 23 24 25 26 27 from keras.models import load_modelmodel_path = output_path + "/model" vgg_model = load_model(model_path + "/vgg16.h5" ) model = vgg_model (train_generator,validation_generator) = load_data(im_size=224 , batch_size=64 ) pred = model.predict_generator(validation_generator, verbose=1 ) predicted_class_indices = np.argmax(pred, axis=1 ) true_label= validation_generator.classes table=pd.crosstab(true_label ,predicted_class_indices ,colnames=['Predict label' ] ,rownames=['True label' ],) print(table)
输出如下:
1 2 3 4 5 6 7 8 9 10 11 12 13 pred = model.predict_generator(validation_generator, verbose=1) predicted_class_indices = np.argmax(pred, axis=1) true_label= validation_generator.classes table=pd.crosstab(true_label ,predicted_class_indices ,colnames=['Predict label'] ,rownames=['True label'],) print(table)
课程作业的收尾自然是画一张有趣的图,混淆矩阵。用来具体分析判错样本的类别。
1 2 3 4 5 6 7 princess_list = list(validation_generator.class_indices.keys()) plot_confuse(predicted_class_indices ,validation_generator.classes ,princess_list)
以及最后再补几句像模像样的分析。
1 2 3 4 5 6 7 8 9 10 11 12 print('公主的数量:\n' ,table.sum(axis=1 ),'\n\n' ) print('预测的公主数量:\n' ,table.sum(axis=0 ),'\n\n' ) pred_true_ratio = table.sum(axis=0 ) / table.sum(axis=1 ) names = list(validation_generator.class_indices.keys()) print('各类的预测数量/真实数量的比例:\n' , pred_true_ratio,'\n\n' ) print('公主名称:\n' ,pd.Series(names),'\n\n' ) print('比例最低的“小冷清”:' ,list(validation_generator.class_indices.keys())[np.argmin(pred_true_ratio)]) print('比例最高的“大众脸”:' ,list(validation_generator.class_indices.keys())[np.argmax(pred_true_ratio)])
1 2 3 4 5 6 7 8 9 10 11 12 13 14 15 16 17 18 19 20 21 22 23 24 25 26 27 28 29 30 31 32 33 34 35 36 37 38 39 40 41 42 43 44 45 46 47 48 49 50 51 52 53 54 55 56 57 58 59 60 61 62 63 64 65 66 67 68 69 70 71 72 公主的数量: True label 0 31 1 56 2 20 3 22 4 30 5 44 6 52 7 20 8 33 9 24 10 33 11 36 12 36 13 23 dtype: int64 预测的公主数量: Predict label 0 11 1 155 3 3 4 5 5 96 6 95 8 5 10 33 11 50 13 7 dtype: int64 各类的预测数量/真实数量的比例: 0 0.354839 1 2.767857 2 NaN3 0.136364 4 0.166667 5 2.181818 6 1.826923 7 NaN8 0.151515 9 NaN10 1.000000 11 1.388889 12 NaN13 0.304348 dtype: float64 公主名称: 0 艾莎 1 爱丽儿2 爱洛公主3 安娜4 白雪公主5 宝嘉康蒂6 贝儿公主7 蒂安娜公主8 花木兰9 灰姑娘10 乐佩11 梅丽达公主12 茉莉公主13 莫安娜dtype: object 比例最低的“小冷清”: 安娜 比例最高的“大众脸”: 爱丽儿
看一看错分样本,尝试找到错分的原因。主要还是训练集风格不统一,有2D有3D,有官方作品有同人作品,有漫画作品有电影作品……
1 2 3 4 5 6 7 8 9 10 11 12 13 14 15 16 17 18 19 20 21 22 23 24 25 26 27 28 29 30 31 datapred = predicted_class_indices.tolist() datatrue = validation_generator.classes.tolist() wrong_len = validation_generator.n - list(map(lambda x: x[0 ]-x[1 ], zip(datapred, datatrue))).count(0 ) print('一共错误预判了 %d 张图片' % wrong_len) validation_generator.reset() X,Y = next(validation_generator) plt.figure() fig,ax = plt.subplots(wrong_len//5 +1 ,5 ) fig.set_figheight(wrong_len) fig.set_figwidth(15 ) ax = ax.flatten() wrong_list = [] k = 0 for i in range(validation_generator.n): if i % 64 == 0 and i != 0 : X,Y = next(validation_generator) if list(map(lambda x: x[0 ]-x[1 ], zip(datapred, datatrue)))[i] != 0 : wrong_list.append(i) ax[k].imshow(X[i%64 ,:,:,:]) ax[k].set_title('pred:' + str(princelist[datapred[i]]) + 'true:' + str(princelist[datatrue[i]])) k += 1
分类正确率最高的为灰姑娘(100%:12/12),最低的为爱洛(40%:4/10);最容易被错认的公主为莫安娜(8次),最不容易被错认的公主为茉莉公主(1次)。
其中,白雪公主有4个样本被错判成莫安娜,错分次数最高,而白雪公主的7个错判样本中,有6个都为黑发黑人公主,白雪公主为黑发白人公主,因此可以看出,发色是分类学习的重要特征之一。
双向被错判的公主为,乐佩和爱洛、宝嘉康蒂和爱丽儿、艾莎和爱丽儿、白雪公主和茉莉公主、花木兰和蒂安娜。其中,乐佩和爱洛同为白人金色长发公主,花木兰和蒂安娜同为深肤色黑色长发公主,具有较大相似性,白雪公主和茉莉公主同为黑发,艾莎和爱丽儿同为白人公主,也具有相似性。宝嘉康蒂和爱丽儿,为什么会被认错QAQ?
除了同肤色同发色的公主外,可以看到背景也是分类学习的重要特征,比如莫安娜的训练集图片背景都为海边,被错判的图片背景为白色,因此被错误分类为宝嘉康蒂。
Fine-Tune 解放固有,来点属于自己的东西
既然是站在巨人的肩膀上,那索性做一些大胆的尝试。比如解放最后的卷积层,让模型重新训练一次,看看能不能有更好的效果。
1 2 3 4 5 6 7 8 9 10 11 12 13 14 15 16 17 18 19 20 21 22 23 24 25 26 27 28 29 30 31 32 33 34 35 36 37 38 39 40 41 42 43 44 45 46 47 48 49 50 from keras.applications.inception_v3 import InceptionV3(train_finetune, validation_finetune) = load_data(im_size=224 , batch_size = 64 ) base_model = InceptionV3(weights='imagenet' ,include_top=False ) x = base_model.output x = GlobalAveragePooling2D()(x) x = Dense(128 ,activation='relu' )(x) predictions = Dense(14 ,activation='softmax' )(x) finetune_model = Model(inputs=base_model.input, outputs=predictions) for layer in base_model.layers[:len(base_model.layers)-3 ]: layer.trainable = False for layer in base_model.layers[len(base_model.layers)-3 :]: layer.trainable = True finetune_model.summary() finetune_model.compile(loss='categorical_crossentropy' , optimizer=Adam(lr=0.001 ), metrics=['accuracy' ] ) finetune_history = finetune_model.fit_generator(train_finetune ,validation_data=validation_finetune ,epochs=1 ) if os.path.exists(output_path + '/model' ) == False : os.mkdir(output_path + '/model' )if os.path.exists(output_path + '/acc' ) == False : os.mkdir(output_path + '/acc' )with open(output_path + '/acc/finetune_history.txt' , 'wb' ) as f: pickle.dump(finetune_history.history, f) finetune_model.save(output_path + "/model/finetune.h5" )
对比的结果不重要(其实也是找不到了)。但迁移学习给了我们很多的可能性,比如利用更好的资源做训练,而把训练好的模型参数放入轻量化的应用中。
最终验证集的正确率有60%+,着实出人意料。这或许就是神经网络的有趣之处。
记得老师的总结:“这组同学先用图片训练了一下组里唯一的男生,我估计这位男同学以后去迪士尼玩能当导游。”可惜我过了一个暑假就几乎全忘了呢,而迁移学习竟然能够把学习成果一直保留!(废话)
偶尔也想做个机器人呢。
(完,请享受深度学习之旅)
本文链接:
https://konelane.github.io/2021/09/22/210922transfer/
-- EOF --
转载请注明出处 署名-非商业性使用-禁止演绎 3.0 国际(CC BY-NC-ND 3.0)


